Here, to demonstrate some tricks and insights into making animated GIFs, I shall reveal my cultural antiquity with a reference to the Arnold Horshack enthusiastic hand raise from the TV show Welcome Back Kotter (while cheesy at least for that era, a positive image about school?)
I was recently asked by a colleague if I wanted to be part of a great project again this year, and I was looking for a fun way to show my enthusiasm. What could be more enthusiastic than a Arnold Horshack handraise?
Surely, there was an animated GIF for that (and I won’t stop calling you Shirley).
I came up dry.

This is an internet travesty. What’s wrong with this net generation?
So I did something about it. I used the Giphy GIFmaker with the 4 second Youtube video above and was quickly able to fill in this Internet Culture Gap, even adding text overlay to the GIF with my own Ooh Ohh Horshack GIF. That was easy.
Well there is this.

It’s easy to make a GIF… that weighs in at 3.8MB
This short GIF comes in at 3.8Mb. Most people do not care about the size of media, spoiled as we are by cable internet and 4G mobile. There is a cost, though. and with some know how, we can not only put this fat GIF on a diet, we can do things not possible with the Easy Bake GIF tools.
Whys is the GIF fat? The easy rip and GIF tools merely grab a frame every 0.07 seconds and put it on a timeline. That’s all they can do because they are just an algorithm. This is more or less flip card animation, where the entire screen is changed every 0.07 seconds, whether something moves or not.
This was the motivation for early animators to develop Cel Animation techniques — There is no reason to redraw the same background scenery of say, the western landscape of the Roadrunner cartoons– if it does not change for a segment. Or via Wikipedia
Generally, the characters are drawn on cels and laid over a static background drawing. This reduces the number of times an image has to be redrawn and enables studios to split up the production process to different specialised teams. Using this assembly line way to animate has made it possible to produce films much more cost-effectively. The invention of the technique is generally attributed to Earl Hurd, who patented the process in 1914. The outline of the images are drawn on the front of the cel while colors are painted on the back to eliminate brushstrokes.
Earl’s 1914 idea is something we can use more than 100 years later. Below I detail how I reduced the file size of this GIF animation by a factor of 10 AND added elements that the quick and easy tools do not.
Okay, I am using Photoshop, which of course, limits people who do not have this software.
It could be done, more tediously, in other software (GIMP? pixlr?) by using GIF Exploder to extract the frames of any GIF to single images, delete unnecessary ones, modify others, and repackaged as a GIF with maybe Giphy’s Slideshow tool.
But hey, use what you have. If you open an animated GIF in Photoshop, you should see the frames in the Animation window.
My Horshack GIF created in Giphy came in ay 47 frames, each in its own Photoshop layer.
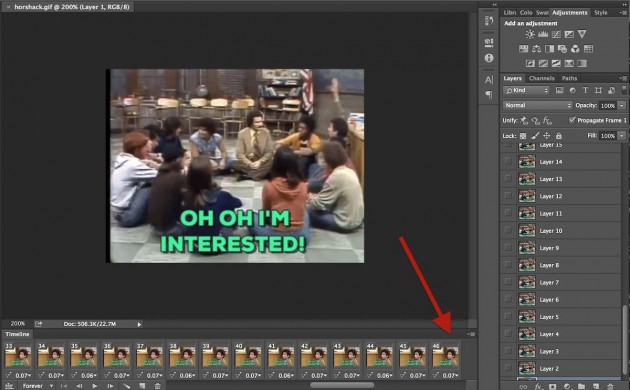
The first thing I do is thin out the number of frames. You can delete ones that do not change much from the previous frame. In GIF animation, you do not really need fluid motion, it is a GIF, not cinema!
I went through from the first segment where we see all the students, and reduced the sequence from 15 frames to 4. Then I start adjusting the timing, which you can do per frame (I know of few tools that let you do it this easily), but also I change the timing from that sequence from 0.07 seconds to 0.1.

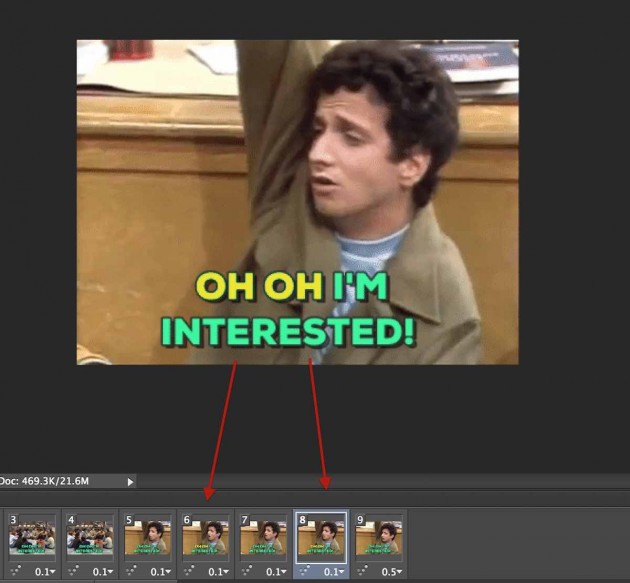
Changing the timing of multiple frames, select the frames, and then use the menu for timing from any of the selected frames.
I think the rest of the sequence, and I have my gif slimmed from 46 frames to 9.

Arnold’s GIF lost a lot of weight!
We can also do some more optimizing at the time of saving as a GIF.
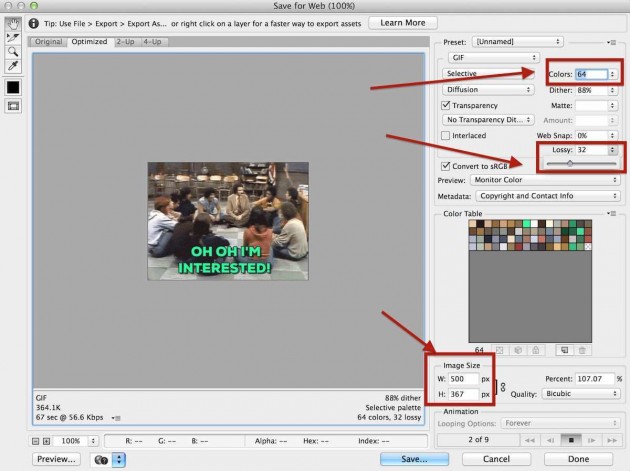
These are settings I fiddle with:
- Numbers of colors– the most you get in a GIF is 256, and for photos, the fewer colors you use, the more grainy it can look. I can live with this since it’s an old show, so I drop it to 64 colors. If your gif is an illustration with lots of solid color, you can get crazy file settings by dropping colors to 16 or 8.
- Lossy – I actually do not know what this setting does, but just started using it more. It does make images a bit noisier, but even ay a few percent, can knock some blobs of weight off.
- Image size If you can live with smaller file dimensions, you can squeeze more weight out of GIFs- but here, since I have saved so much, I am actually going to bump it up a bit from 480 pixels to 500. Whooppie.
So here is the GIF, from 46 frames down to 9, from 3.8Mb down to 387k
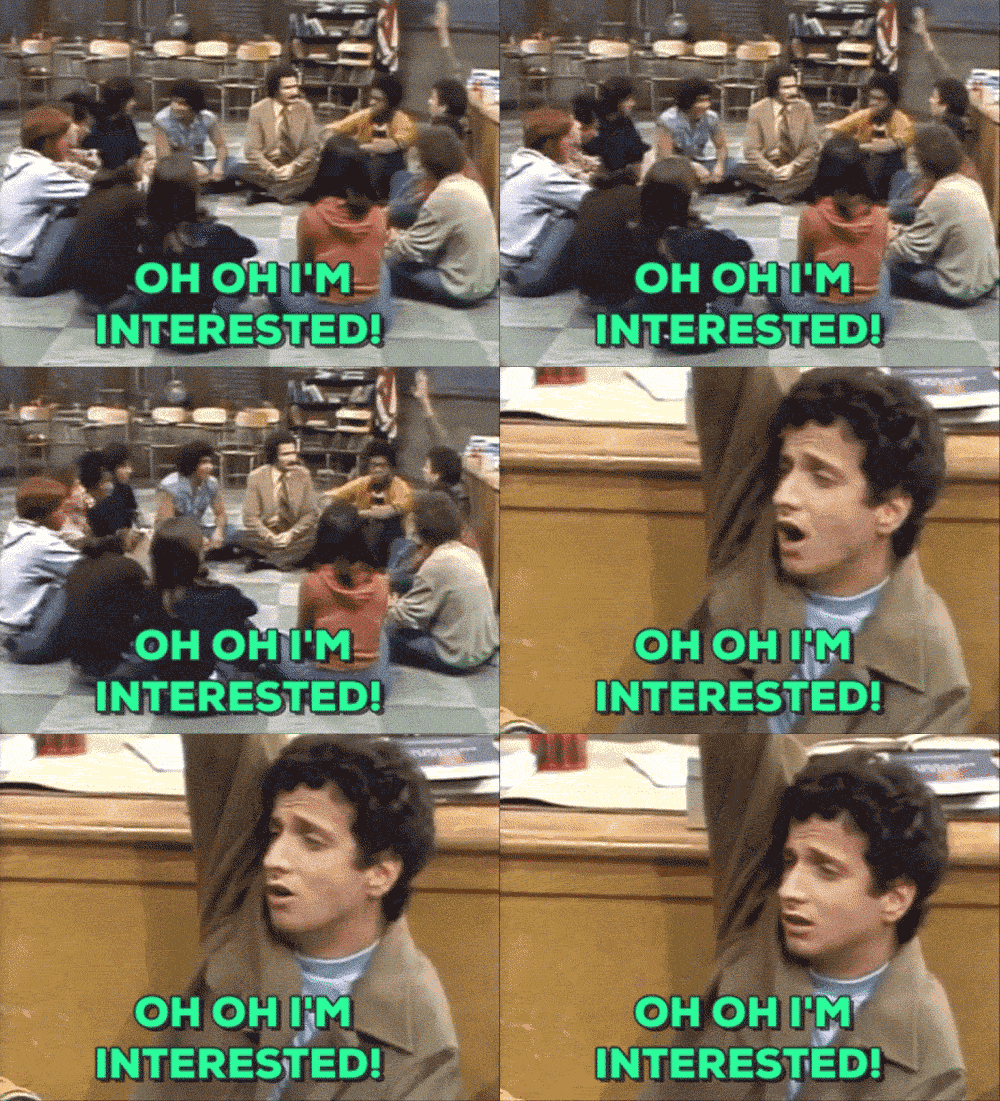
It may not be ultra great with some quality loss (this is different from the goal of doing fancy cinemagraphs), but I can live with it for the purpose I have in mind.
I could stop and call it a day. But why, when I can do more? The Easy Bake GIFS can only use what is in the video and maybe a text superimposed on all layers. But this is animation, and we ought to be able to more changes per frame.
I want to emphasize the “Oh Oh” letters, so I am going to make them flash. I first use the magic wand, and the shift key to create a multiple selection of the green text fill.
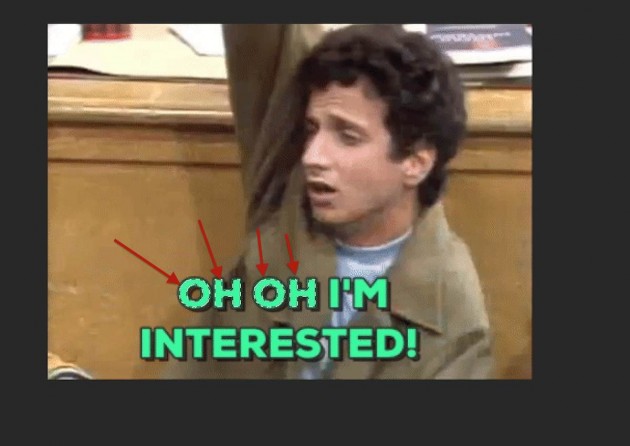
I will then create a new layer, and I want it ABOVE all the others, so I move it to the top of my layer stack, and with that selection still active (what we used to call when this was new as “marching ants”), I fill it with my foreground yellow color, with the short cut “option-delete”.
So now I have filled in those letters, cool! Except it has done it one every frame! That’s not what I want.

Yellow filled success, but it is on all frames…
What I want to do is toggle it off for all frames I do NOT want to see it. There are many ways to do this, I select all the frames in the animation window, and de-select the frame’s radio button in the layer’s palette. Poof, they are all gone!

Hiding the Yellow Fill layer on all frames
What I then do is select the frames where I want the yellow to be visible (alternating frames to make it flash), and then turn ON the layer just for those frames.
Get it? Show and hide stuff using the layer visibility.
More cleanup- the original has a black bar on the left, so I use the crop tool to get rid of that (and reduce the height some, every bit of less pixels is more bytes saved. Cropping one frame affects the entire file.

Flashing colors is one thing, but let’s add a brand new element. Since Horshack has that strident yell, I pull in one of my favorite images of a donkey, that I place to the side. I turns it’s visibility off from the first frames, and move it’s position and resize it in the the Arnold frame.
But I then find out that the move is only done in the one frame, I want that donkey on the side in all the last frames! So I find the frame that I like it’s position (and select it’s layer), and from the menu in the animation window, select Match Layer Across Frames....

Now follow the logic, I have the donkey visible in frames I want it, so I deselect (visiblity, if I left it on, the donkey would be visible in all frames), all I want it to match is the position in frames it is visible.
Now the donkey’s position is fixed… which ends up looking a bit static. So I step trough each frame in the last sequence, with the donkey layer selected, and nudge it a few notches horizontal and vertical so its position bounces around slightly.
And thus, with these tricks done, my new and improved Horshack Ooh Ooh GIF is done as much as I want to go, and comes in with more animation at 379k vs the 3.8Mb of the one Giphy popped out of the Easy GIF oven.

Now this is a basic example. But what I have found with GIFs is– if you can create a background layer that does not change (like cel animator Earl Hurd figured out in 1914), and then just add or move the smaller parts that change in overlaying layers, you can do rather complex GIF animations that do not have large file size… only the parts that need to move, are ones that are repeated.
I still use Giphy to grab the original sequence for my GIFs (probably w/o the text overlays) and then do my photoshop mods to those files.
If you want to poke around with my Photoshop file, you can fetch it from Vinnie Barbarino.
I never thought I would spend 90 minutes blogging about Arnold Horshack. Long live enthusiastic hand raises.
Top / Featured Image: screen capture of the famous (well long ago) Arnold Horshack hand raise from the show “Welcome Back Kotter”, found on YouTube https://www.youtube.com/watch?v=-cDAqrywsHE. I’ll leave it to the lawyers ravens to sort out the legality of re-use.


Hi Alan,
Great post. One of the most enjoyable things about making gifs is trying to slim them down.
This might make a good DS106 assignment. Providing the huge source gif and challenging folk to make it as small as possible.