This week in ds106 I give my students the ultimate bootcamp creative challenge – to figure out how to make an animated GIF. The exact wording is “from a favorite movie” but that’s just to get them thinking about topics.
Since I do the same work, I needed to step up too- I did two quick demos of GIFfing in GIMP in this week’s Open Lab, so for tonight’s masterpiece I wanted to show some techniques I have been using in doing GIFs in Photoshop.
I chose a subject that could reflect what to do when you get into trouble in ds106 – activate the GIF Signal!
This is one where I do some dancing around with Photoshop layers and masking out all but the essential bits. One benefit of doing this is your GIF files get dramatically smaller since they have to store less data. I hope I can reconstruct the steps!
I thought there would be more clips in Youtube; but this one from the Tim Burton Batman film had the signal, for a few seconds at least:
I used the pwnyoutube bookmarklet tool to download a 720p HD clip, always better when you get a higher quality source video. Ti get my trim, I opened in MPEG StreamClip and marked the in and out pounts of the section I needed.

I went to Edit -> Trim to get just the segment. I then saved the clip – but rather than keeping the .mp4 original format, I chose .MOV from the small drop down menu at the bottom. This is because PhotoShop CS5.5 can only open .mov videos.

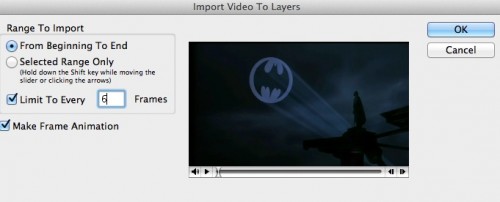
To bring the clip into Photoshop we use File -> Import -> Video Frames to Layers. The settings here may take some fiddling. I chose to save every 6 frames because the segment is so short, on a longer clip I might go every 10 or 12 frames. You dont want too many because the point is to reduce it to a handful. But make sure the “fram animation” box is checked.
Bring up the Animation palette (under Window). I start stepping through the frames, trying to delete ones where there is not significant motion from the previous. IN this clip there is only minor movement of the Bat Dude. Also, the signal in the sky kind of warbles, but I have plans to change that. I get it down to 7 key frames. The whole point is to reduce it to a minimal amount. Frames where little changes is wasted space in the final file.

Now I know I want to do some effects in layers and add some elements. To do this I need to make a background layer that will be consistent across all frames. I do this by making a copy of the first or lowest layer. By default it ends up visible across all other frames each freme usually has only one layer visible, but we can switch them on and off in individual frames.

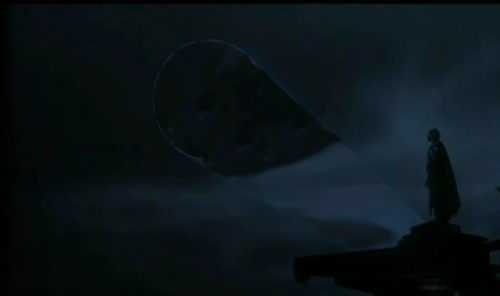
For the background, I will want to wipe out the signal and its beams. Here is where the detailed effort with the clone brush pays off. You option click on one area as the source, and paint over another area, starting with the bat signal

Getting rid of the beams in the signal was a bit trickier, I ended up paint brushing in and using the smudge tool to cover the beams.
Now I want to go to another frame, and cut out the beam and signal. I want to get this to its own layer (above all other layers) so I can control its appearance by turning it on and off as a visible layer. I do bit of magnetic lasso, feathered edge to select what I want to move to its own layer:
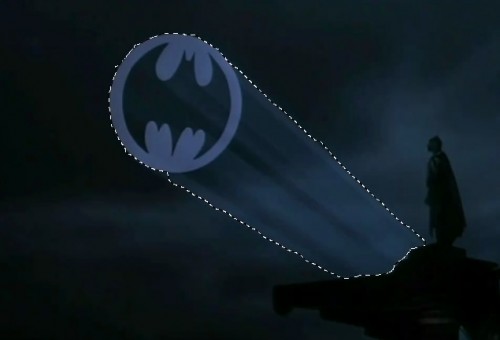
I make sure this layer is above all the others. It does leave an ugly hole, but I have a plan.
But I first dress up the signal, filling it in as a solid (bye bat signal!)

Now to deal with the ugly hole left behind. I use the magnetic selector to make a selection of just the caped crusader and the platform he is standing on. I then invert te selection..
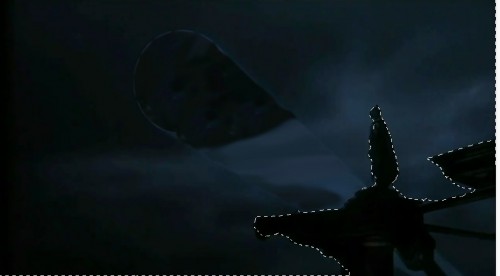
And I can delete all of the sky in upper frame. I will modify this selection on each frame because Batman is movine, but the idea is to remove all of the sky from the 6 other animation layers, so the only sky we see is on that base layer we made by clone brushing out the bat signal.
By toggling the visibility on the frame with the signal, I can make it appear in the last 5 frames, as if it turns on in frame 3.

We are getting close! The next thing is to add an element, I import a PNG file with our signal content, and place it over te layer with te signal beam.
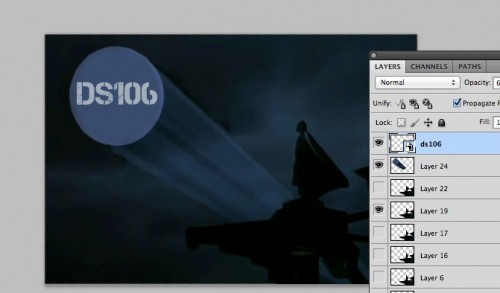
Now I don’t want this to appear until frame 4, which I can do with the visibility toggle in the layers palette. But its a bit bright, so the first frame it appears at 15% opacity, then 30%, then 60%.
The last thing is to set the frame rates. I want it to sit on the first frame longer, so I set its rate to 2sec. For the next frames, I select them all, and set the menu of one to 0.1, which sets them all to that frame. I change the last one to be 1 second, so that lovely signal lingers.
So here is the final setup:

I’ve cropped a big chunk of plain sky on the left, and resized the entire image to be 500px wide (the width of the publishing space on my blog). This cuts down the final file size quite a bit. But look at the layers- only one layer is completely full the others only have small pieces- working in this matter can reduce the file size dramatically – this GIF only weights 125k.
It’s not the best, the freezing motion of the cape in that last frame bothers me. But I hope you get the idea of wat I am doing here.
The keys to this approach are to recognize what you need as a background layer across all frames (and this typically takes some clone brushing to full in regions) and how to separate all of the other items you may want to have appear or disappear. You cannot do any movement of objects in layer (unless you flip the animation palette to the timeline mode, but those become harder to work across frames).
Layers are the way to rule the GIF- if you get good you can reduce the jerkiness of many GIFs and or be able to isolate just the smallest amount of movement. You can do some of this same masking in GIMP- check out Jim Groom’s excellent tutorial video.
The GIF light is on!
