This is part 2 of 5 in a series of posts for Building Connected Courses: Feed WordPress 101.
- Basic Concepts of Syndication – and what to think about even before you touch that WordPress thing
- »» Installing and Setting up Feed WordPress «« – Minimal settings, and planning the way content is sliced, diced, and recombined
- Feeding the Machine – How to get RSS feeds into the aggregator without losing a finger
- Some Feed Magic – Optional ways to improve feeds from sites such as flickr, twitter, etc, creating a twitter archive, RSS Feed TLC
- A Few More Tricks – leveraging categories, adding attribution, setting featured images
In the previous section, we planned out a structure for our syndicated content. Now let’s plug in the machine and twiddle a few dials.
Come Back for the Theming
Many people start this path by trying to figure out the way the site should look, trying to find the ideal theme for their hub. But that is like picking out the living room paint color before the framing is put into place. Start with the infrastructure, here with the plugin that does the syndication work. Use the default theme WordPress provides for now; later we will suggest some themes to try or features to look for in themes.
Plugging in Feed WordPress to Your Site
I’m going out on the limb here and guessing that you know how to install a plugin in your WordPress Site; if not, got link?
In your dashboard, look for the place to add plugins, and do a search for FeedWordPress. Install it. Activate the plugin.
Do you feel the heat?
If you like documentation, check the wiki on the developer’s site.
Basic Settings
 Feed WordPress has a number of settings that are applied to each RSS feed you add to your site. We will make a few default settings, but keep in mind you can alter them for individual feeds added.
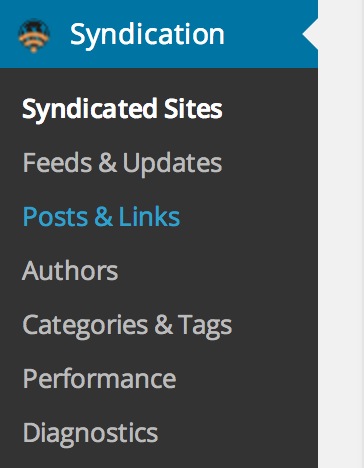
You find them listed under Syndication in the WordPress Dashboard admin screen. I will review them in order. Unless specified below, you are good to go with the default settings. Quite a few of them are ones you never should have to change. They are pretty well explained.
So in order of appearance in the admin dashboard, start changing the settings as listed below.
Feed and Update Settings
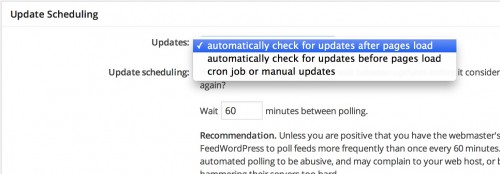
Look in the second section labeled Update Scheduling. The default setting is cron jobs or manual updates. This means that feeds are never checked unless you click an update button or if you are savvy enough to know how to set it up as a “cron” job (one scheduled into the the web servers automated script system):
It is fine to leave this alone while you are setting up the site and testing. You will have to click an update button on the Syndicated Sites screen to generate a request for the feed information.
But ultimately you want the site to do this automatically. You can get all techy and set up a cron script, but it will do just as well for 99% of the web sites if you change the schedule to be automatically check for updates after pages load
This means that as visitors come to your site, the simple act of viewing pages will trigger the update scripts. This does not mean every page view sends out the request; it just sends a message to the plugin and asks if has been more than an hour since feeds were checked. It only requests new data if it is due an update.
Syndicated Posts & Links Settings
What Feed WordPress does when it reads an RSS feed is to make a new post on your course blog that has a copy of all the content that is from the blog the feed comes from. You should think now about the way you want your aggregator site to work:
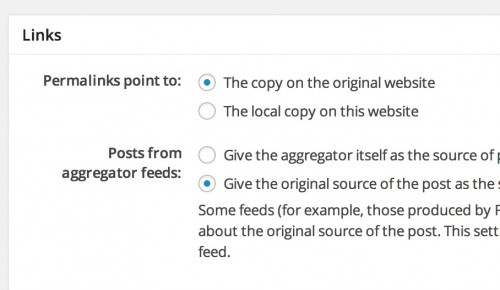
- Links to the post syndicated on the aggregating site point to the original post. Most of the sites I have created work this way, it reinforces the distributed nature of the connected course. What it means is that while a copy stays on the course site, typically on a view of blog posts, the excerpt (or first chink of content) is displayed on the course site, but clicking the post title or a “read more” link takes a reader out to the original site.
- Links to the post syndicated on the aggregating site point to the copy on the aggregating course site. This means that it looks like all the syndicated blog posts were authored on the course site. Mostly people do this when they want a connected course site where the activity mostly stays there; a reason to do this might be if you want all of the comments on syndicated blogs to stay on the course site.
This link to a post is called a permalink. You set edit this setting in the second part of the Feed WordPress settings under Links:
This feature of Feed WordPress is very useful in connected courses as an archiving mechanism. Again, in most of the sites I have built, we use the option for permalinks point to the original post. Often after a course ends, students might delete their posts or their blog entirely. There is a feature you can use, that turns off the subscription, and reverts all of the links on the course site to point back to the local archived copy.
A related setting you will want to look it is under Comments and Pings.
If you are setting up your course site so that links go to the original blog post, it makes sense that any link to add a comment should go where that posts is, and change the first setting here to Don’t allow comments on syndicated posts. But if you are making all of the permalinks point to the local copy, you most likely want commenting to happen on the course site, so use the setting for Allow comments on syndicated posts.
Syndicated Author Settings
There is nothing to change in this section. By default, Feed WordPress will be creating a basic user account on your site that is associated with each feed, so a blog then acts like a user who posts to your site. This allows you to use the site’s author links and archives to show all syndicated posts from one site.
The only reason you might want to change this is if for some reason you want all the syndicated content to be associated with a particular existing user account on the site (I have never done this).
Categories & Tags Settings
This may be the most important initial setting; so make sure you have a solid understanding of the way we are mapping tags and categories from syndicated content.
To re-iterate, we will change to settings to make it so all tags AND categories that are in the original syndicated posts are mapped to WordPress tags on the course site.
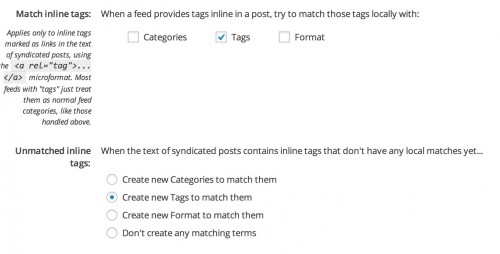
In the first part, we change the settings so that all incoming categories are turned into tags, and that if there is a new one, we create a new tag to use for it. Change your own settings to match:
Make a similar change for the settings of inline tags, change your settings to match:
With these settings we have made all of the incoming means that people organize their content end up as tags on the course site.
Now we want to set the site up so it will attach the categories we want to apply to each feeds; this allows us to organize syndicated content in meaningful ways on the course site.
In our last section, we discussed a reason to apply a top level category (I use “Syndicated”) to all feeds. This gives our site an ability to have a “flow” archive, a display that shows the flow of everything possible syndicated into the site (see the flow on ds106 or all “vectorized” content on Thought Vectors).
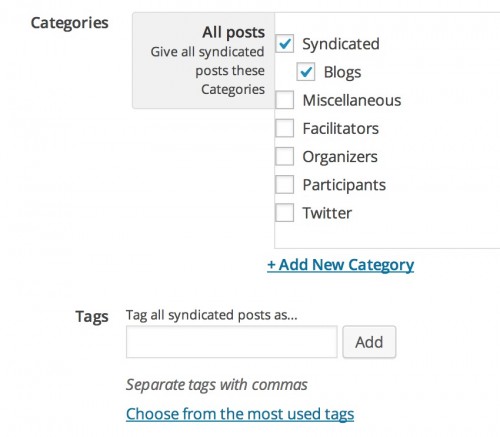
So we make sure the Syndicated category is added to every post we bring into the site:
You will notice that I have also added the Blogs category (a child of the Syndicated one) to also be added to every syndicated feed. I do this because nearly all of the feeds I will add are going to be from blogs, so I will not have to change any of these settings when adding a blog feed to the site.
For anything else, like a twitter feed or a instagram one, we will just override this setting on a single feed.
You also have an option to add a tag to all incoming feeds, if you have a need for that, just enter it in the box under “Tag all syndicated posts as…”
That’s All, Folks!
With these settings, your syndication machine is ready to go. In the next post, we will review some considerations and practices for collecting the feeds for your site and the nuances of managing them.
But let’s jump the gun and add one now. Go to Syndicated Sites from the Syndication menu in the WordPress dashboard. When you add feeds, they will all appear here as a sort of dashboard for your connected course.
To add a site where we will syndicated all of its content (every single post!), put the site’s URL into the box on the top right labeled “New Source”. A fine example is a site at http://cogdogblog.com/
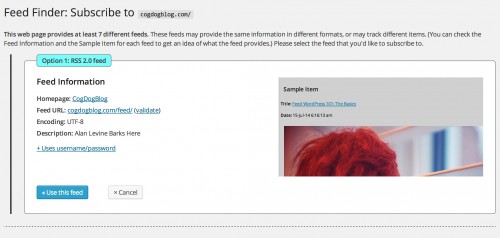
When you click Add Feed WordPress will let you know how many different RSS feeds it discovered by looking at the source HTML of the home page. Each will show a preview of the content ( or pink box warning if something is awry). For nearly every blog, you are safe taking the first one it finds, so we can click Use Feed
And with that, you should see one of the most interesting blogs on the internet appear in your list of Syndicated Sites. You can force it to check for new content by clicking the Update Now button
Feed WordPress will load and you should see at the top an indication of how many posts were added (it will skip any that it got the last time). You can see on the image above that it provides information about the last time it was checked.
If this is working, you can return to the Feeds & Updates screen and make sure it is set to check after a page loads.
Some More Under the Hood Info
Feed WordPress stores all of the information about the feeds you have added to your site in the Links collection of WordPress. Most sites do not even use this; it was originally created to build different sets of web links for old fashioned ideas like Blog Rolls. WordPress stores information about each link you add to it- a title, a link, an RSS feed, and a few more things.
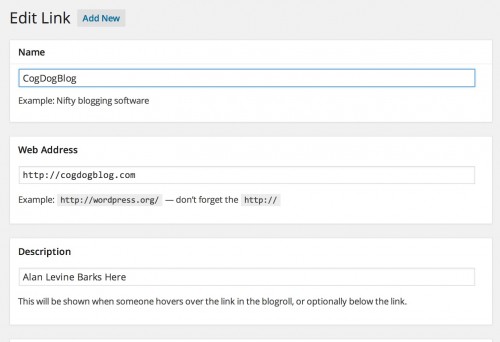
Feed WordPress adds each new feed to put into it as a new link, in a category called “contributors”. You can inspect them if you follow the “Links” link in your dashboard. SO if you added the Best Blog on the Internet to your site, if you click it’s edit link in the Links are, you will see some info
It finds the name of the blog, it’s URL, and its description from the RSS feed itself (each feed includes information about the source it comes from, the “Channel” details). This means, if ever I change the title of my blog or its description, those changes will be automatically updated the next time Feed WordPress checks its feed.
That’s neat, eh?
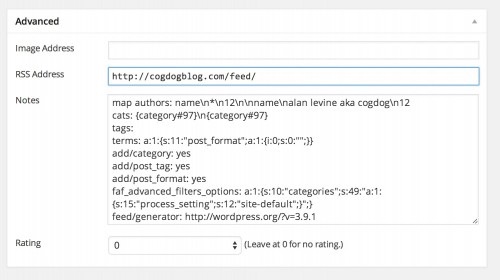
If you scroll to the bottom of the links page, under “Advanced”
The RSS address is the one that Feed WordPress checks (and this is the place you might have to change if one is wrong). And there is a lot of gibberish in the Notes field. These are other important things Feed WordPress uses internally. For the most part you will never have to look here, but in rare cases you might have to update a value in the Links area. And it makes sense to know where Feed WordPress stores its data.

Mine and only Mine!!! flickr photo by Kalexanderson shared under a Creative Commons (BY-NC-SA) license
What’s Next?
Now you are ready to add more feeds to your site. In the next section, I will introduce a method to collect this info, and walk you through some of the nuances because… well not all feeds are created simple and equal.
Building Connected Courses: Feed WordPress 101
- Basic Concepts of Syndication – and what to think about even before you touch that WordPress thing
- »» Installing and Setting up Feed WordPress «« – Minimal settings, and planning the way content is sliced, diced, and recombined
- Feeding the Machine – How to get RSS feeds into the aggregator without losing a finger
- Some Feed Magic – Optional ways to improve feeds from sites such as flickr, twitter, etc, creating a twitter archive, RSS Feed TLC
- A Few More Tricks – leveraging categories, adding attribution, setting featured images
Featured Image: How Circuits were Wired flickr photo by cogdogblog shared under a Creative Commons (BY) license







If you can’t set up a cron with your host you could run this manually in your browser or use a service like this: https://www.easycron.com and a step-by-step tutorial on how to setup Cron Job in FeedWordPress
https://www.easycron.com/cron-job-tutorials/how-to-set-up-cron-job-for-feedwordpress, hope this helps.
Thanks Bob, I have uses easycron for other projects. I hesitate to mention it and not sure what advantage running Feed WordPress via a cron script over the built-in refreshes the the plugin does based on views coming to the site. If a site has visitors, than the updates get triggered. Every site I have done since ds106 has used this route. This tutorial is meant to provide the smallest overhead for getting things to work.
Alan, thanks for this. I’m sure I could figure this out myself but having this guide is a great service.
So I am thinking if I want to keep a record of previous courses going into the future I should choose the setting “Permalinks point to:” to be “The local copy on this website”, right?
Its a design choice. I prefer during a class that permalinks go to original sites and thus thats where comments happen. At the end of a course you can use an option under unsubscribe to “revert to locsl copies” which tskes care if cases where students nuke their blogs.